Tiếng Việt
Guide to Creating an Order with Embroidered Products
Custom embroidery products (Embroidery on Demand – EOD) are increasingly gaining attention from sellers, especially as the Print on Demand (POD) market becomes fiercely competitive. With significant growth potential, the EOD market is seen as a new “blue ocean,” opening doors for sellers to numerous promising business opportunities.
To meet the diverse fulfillment needs of sellers, BurgerPrints has officially started fulfilling embroidery products. Sellers can creatively design a variety of unique and sophisticated products to attract customers.
Currently, BurgerPrints offers the following order creation methods for embroidery products:
- Creating orders directly on the system
- Creating orders using a CSV file
- Creating orders via API
Instructions for creating orders directly on the system
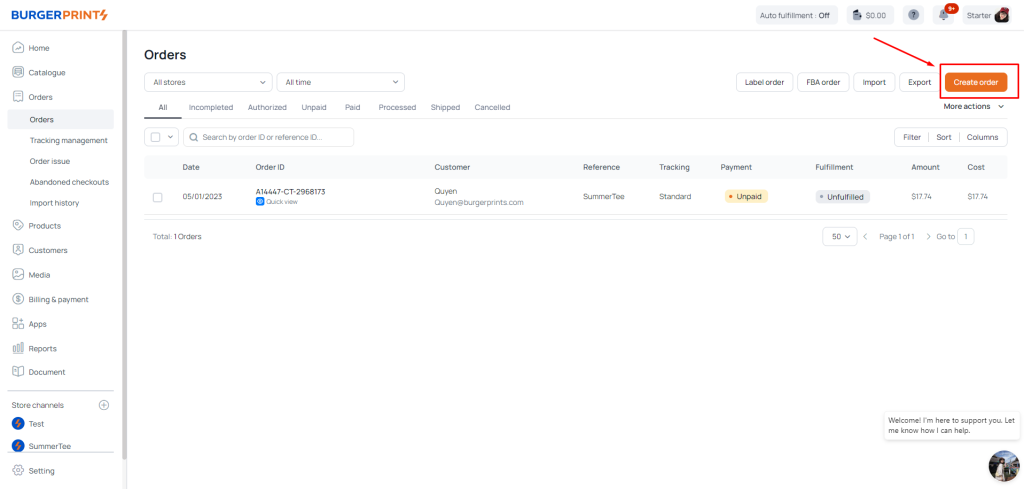
Step 1: Log in to the system at https://dash.burgerprints.com/. In the left menu of the Home screen, select Orders. In the Orders screen, select Create.
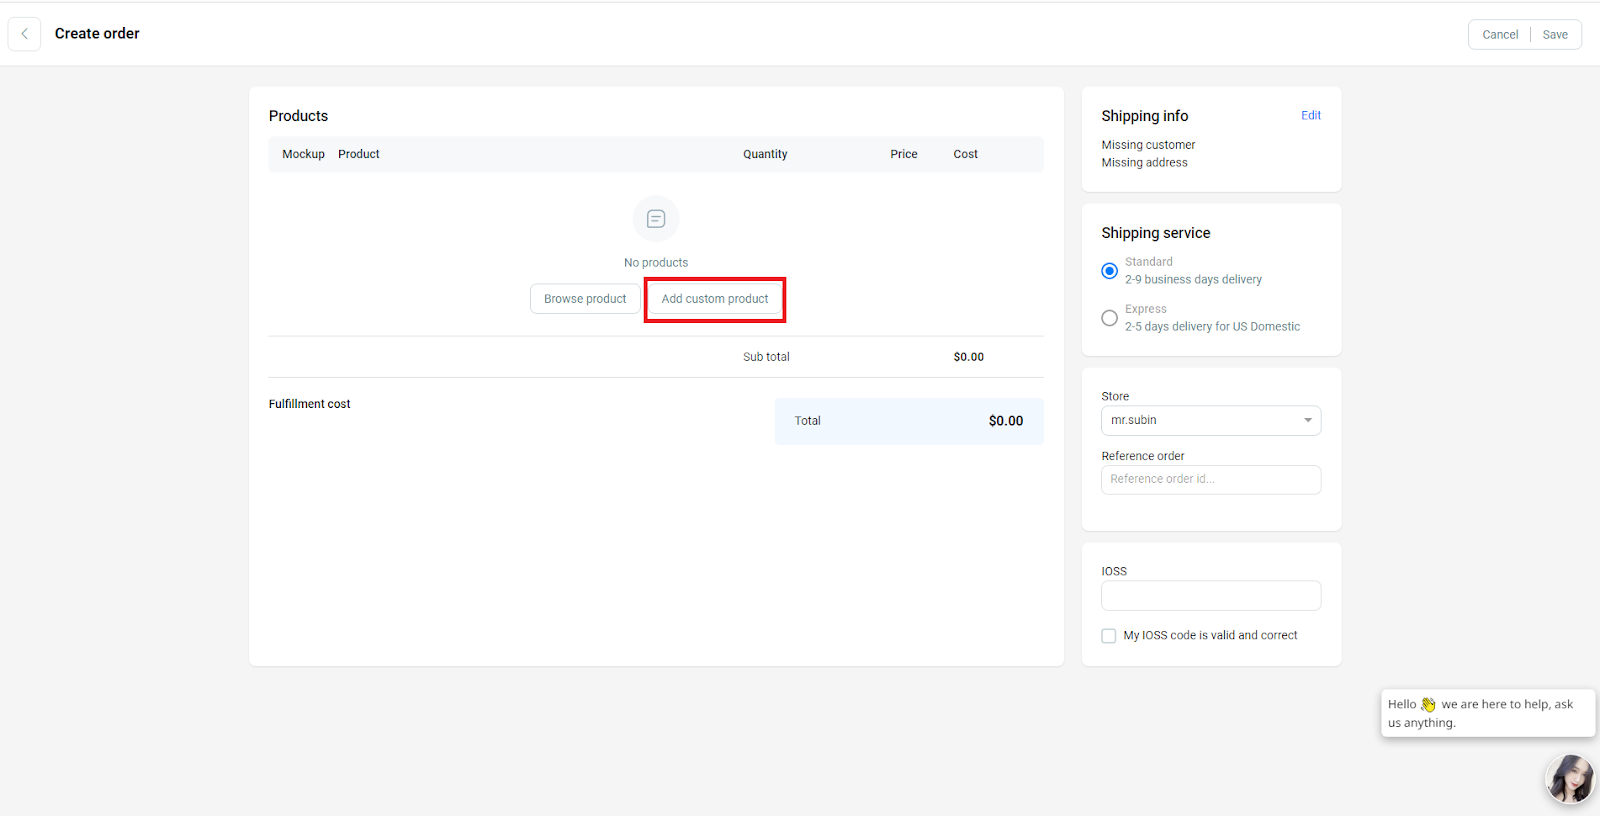
Bước 2: At the “Create Order” screen, click on “Add custom product” to add a new product you want to include in the order.
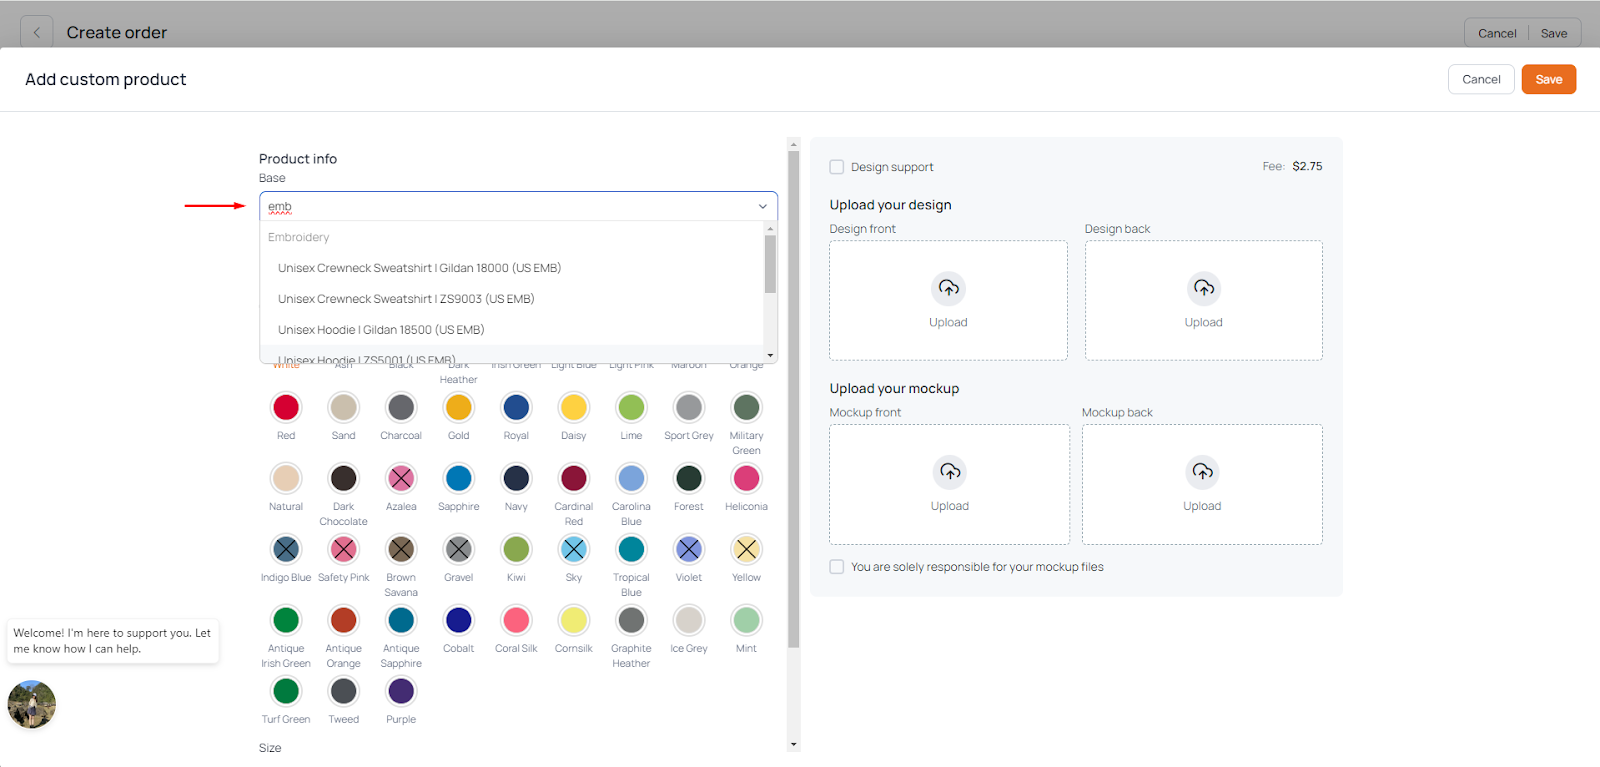
At the Add custom product screen, you perform a search in the Base field with the value “emb”. The system will display all the embroidery bases that you are allowed to create orders for.
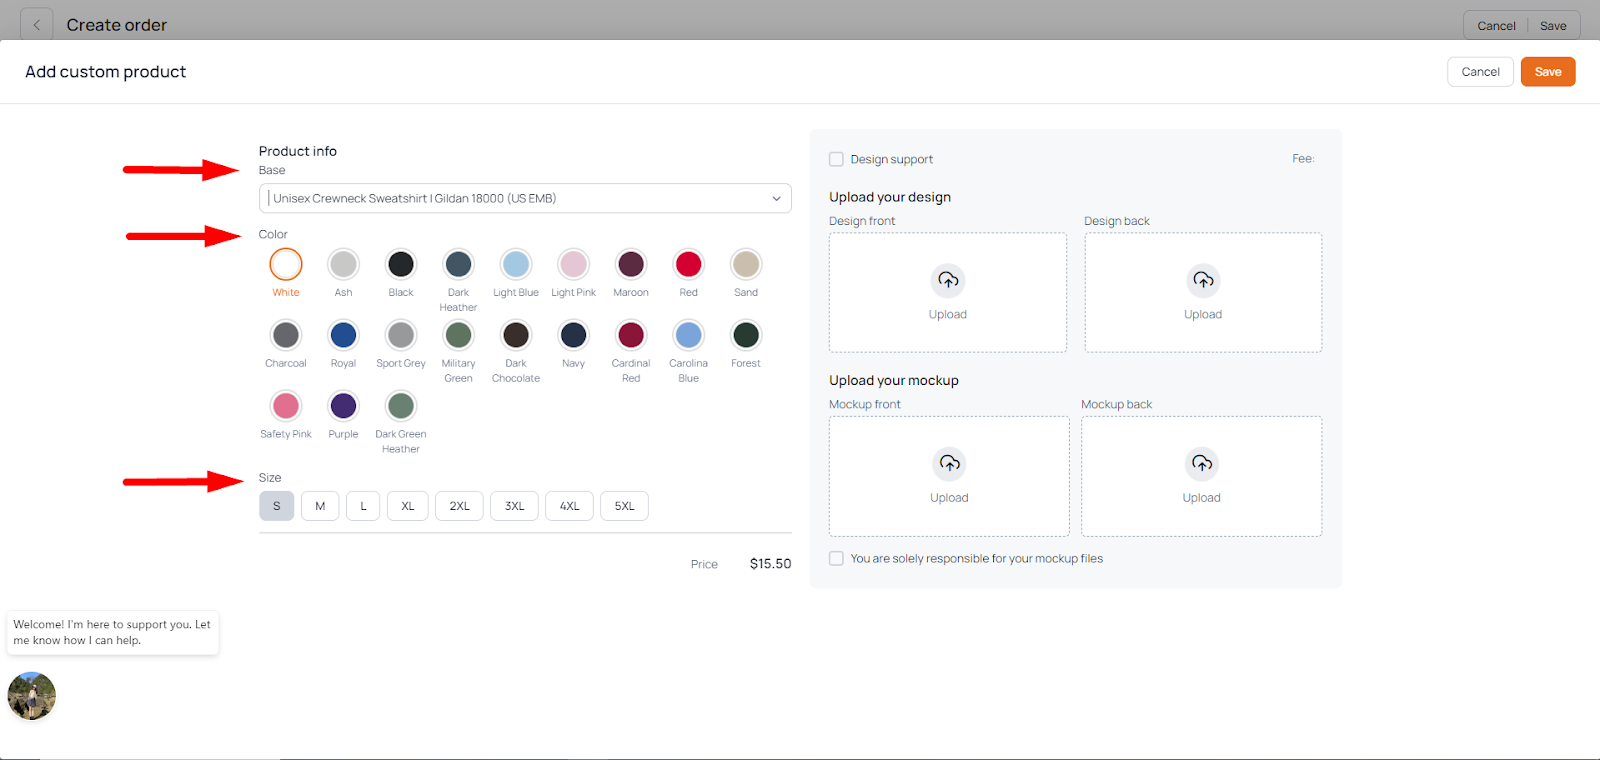
You select the desired Base, Color, and Size in the Product info section:
Base: to choose the type of product you want to order. Note that embroidered products are categorized under Embroidery and have the word EMB in their names.
Color: select the colors.
Size: select the size for the product.
You select the embroidery area in the Style field. The system allows you to change the selected embroidery area and you can choose multiple embroidery areas if desired.
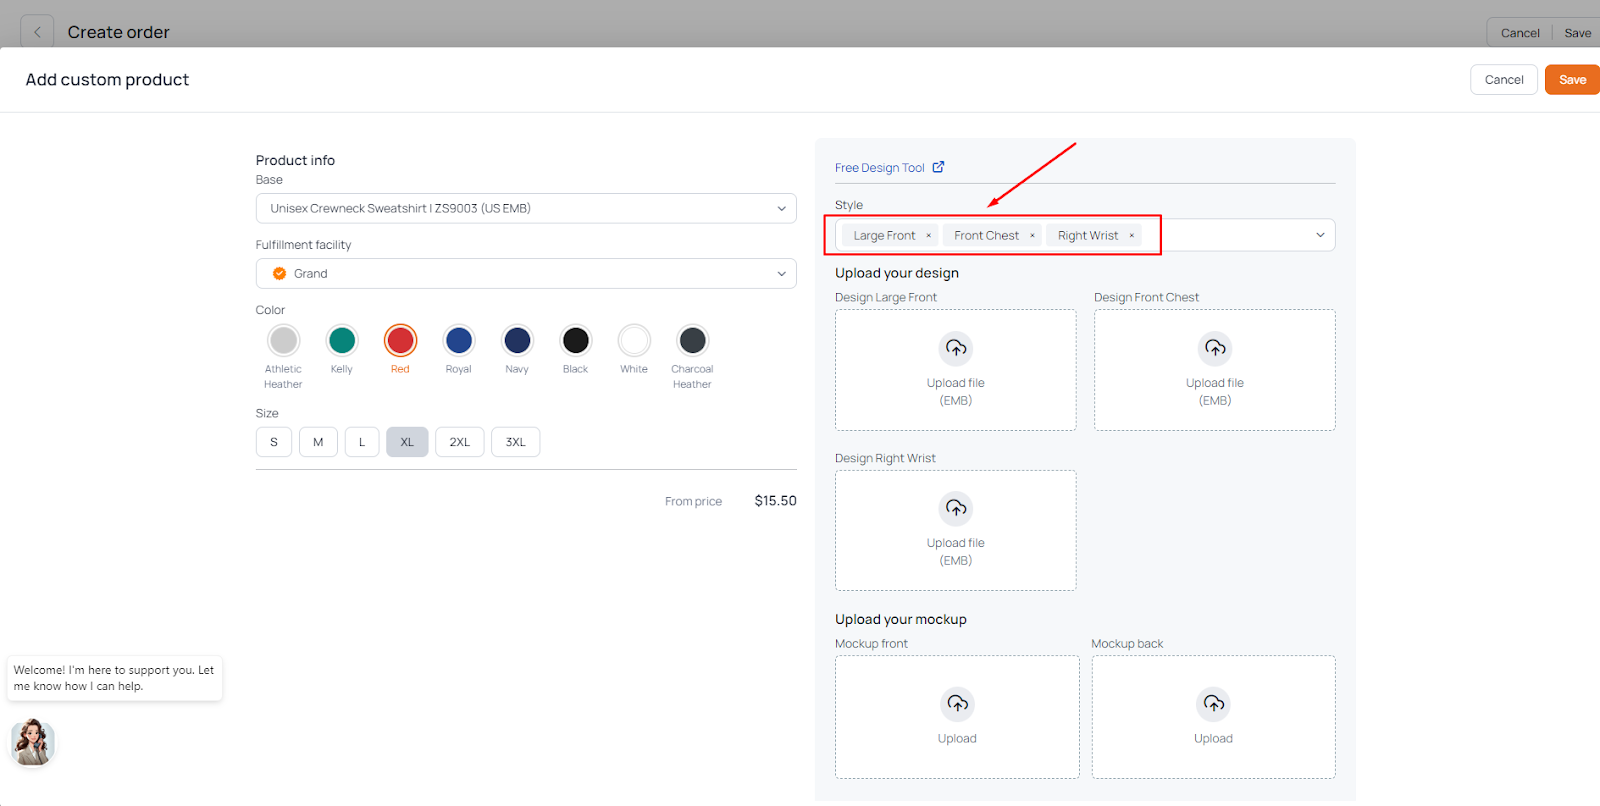
Next, click on Upload file to upload the design file.
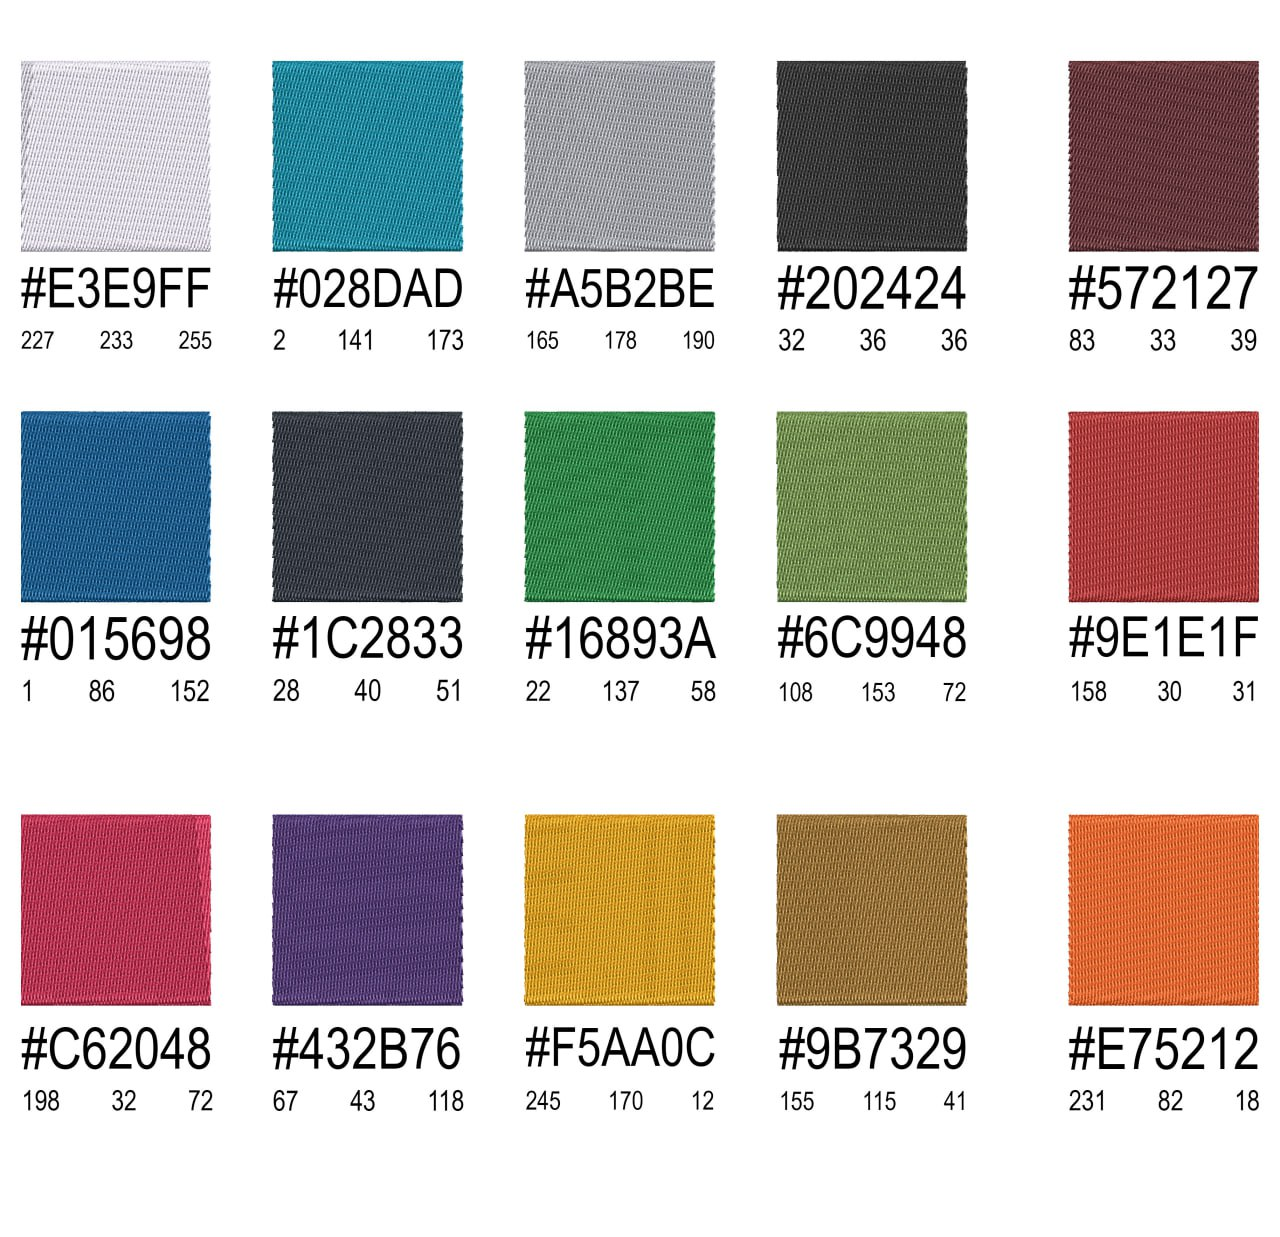
Note: A valid design file will meet all the following requirements:
- Design file in .emb format
- The file size should not exceed 20MB.
- The design file should be created and saved using Wilcom software under the type Wilcom All_in_One Design e4.2 (*.EMB). Refer to the link to download the Wilcom app here!
- The design file should contain colors within the list of 15 colors allowed by the system. See the list of accepted colors in the Color List.
A mockup is not required when you create an order with embroidered products. You can choose to upload one or not, depending on your needs. Finally, click Save to complete adding the product to the order. Note that the system does not allow you to create an order containing both printed and embroidered products simultaneously.
Step 3: In the Order section under Shipping info, enter the recipient’s information and the shipping address. Note that the Shipping Address must be a US address. The system will not allow you to successfully create an order with any address outside of the US.
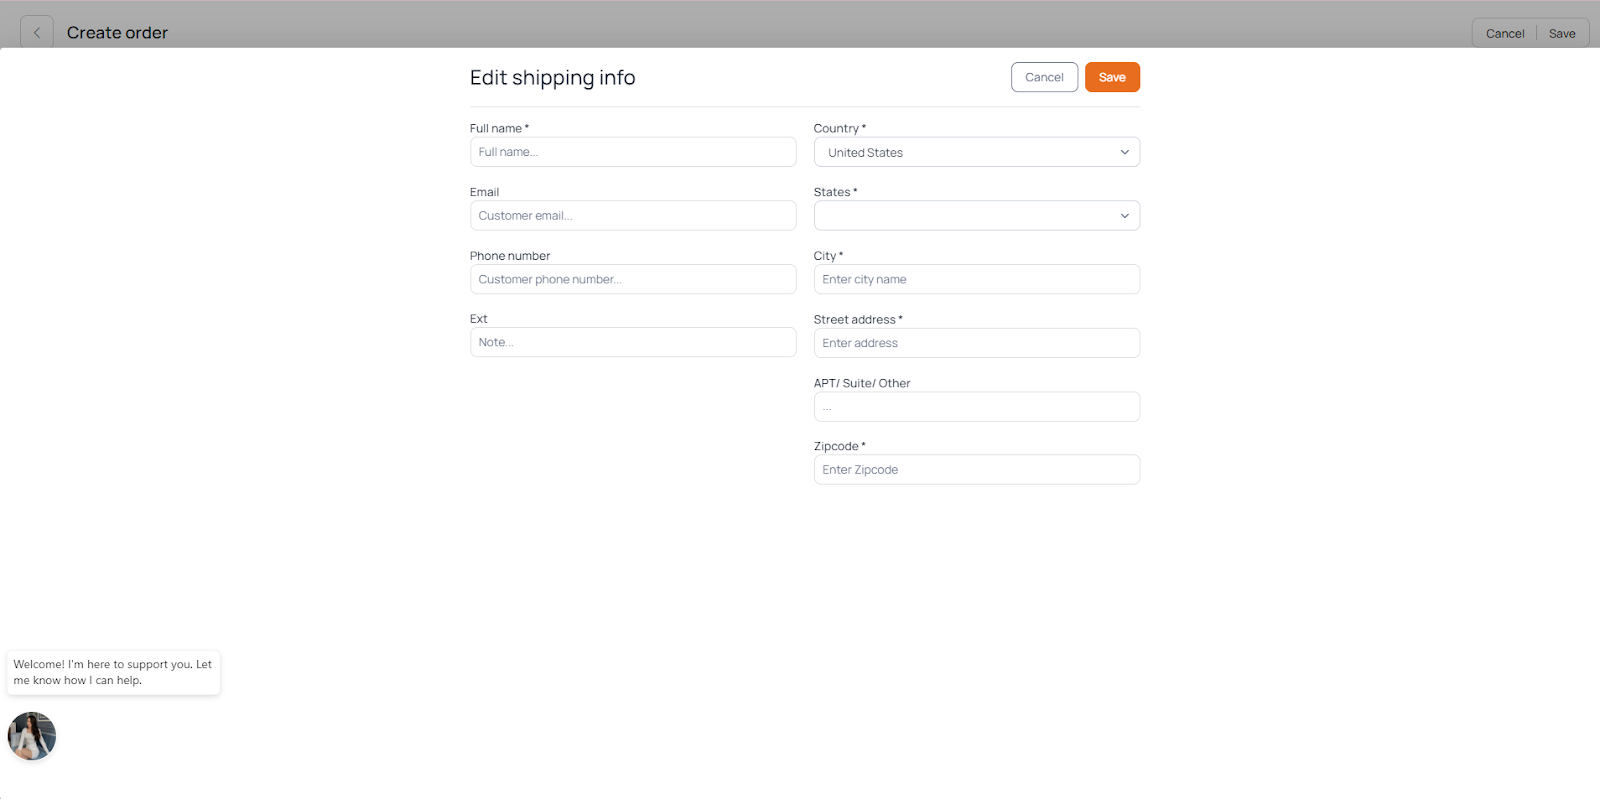
With the Shipping service, you can choose either Standard or Express.
Finally, click Save to save the order. The system will display a notification “Save order success!” to confirm that your embroidery order has been successfully created.
Creating an Order Using a CSV File
To create an embroidery order using a CSV file, you need to access the Dash system of BurgerPrints and follow the instructions.
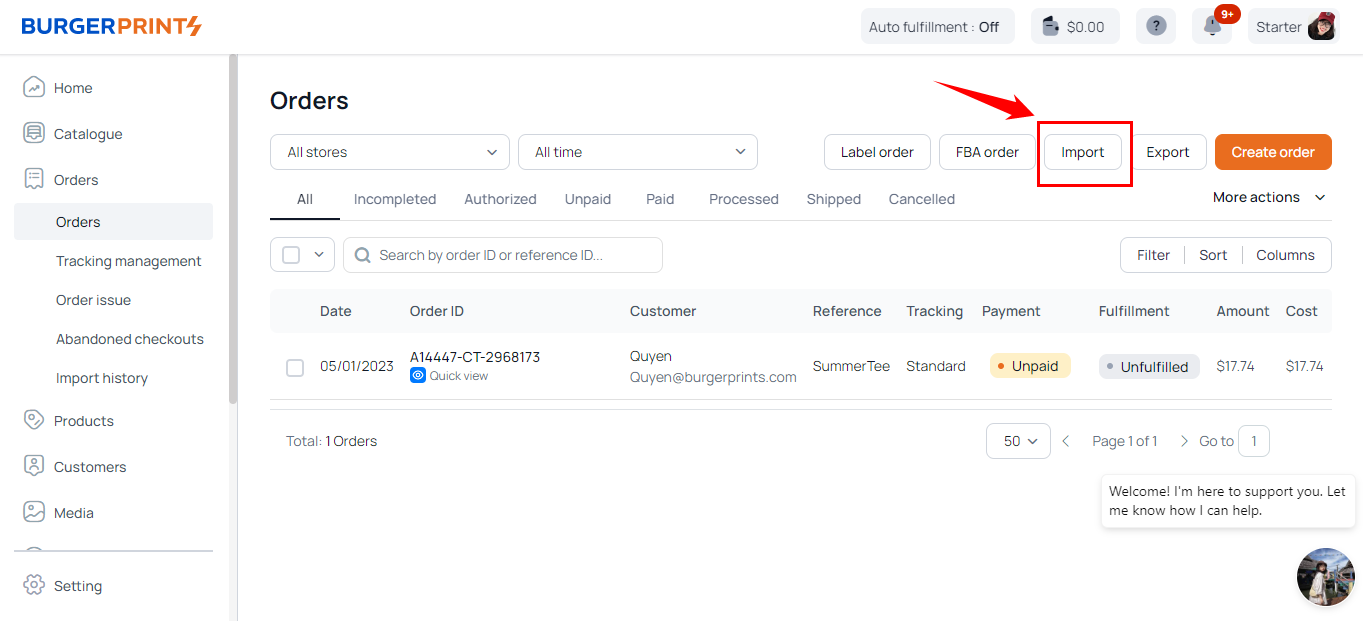
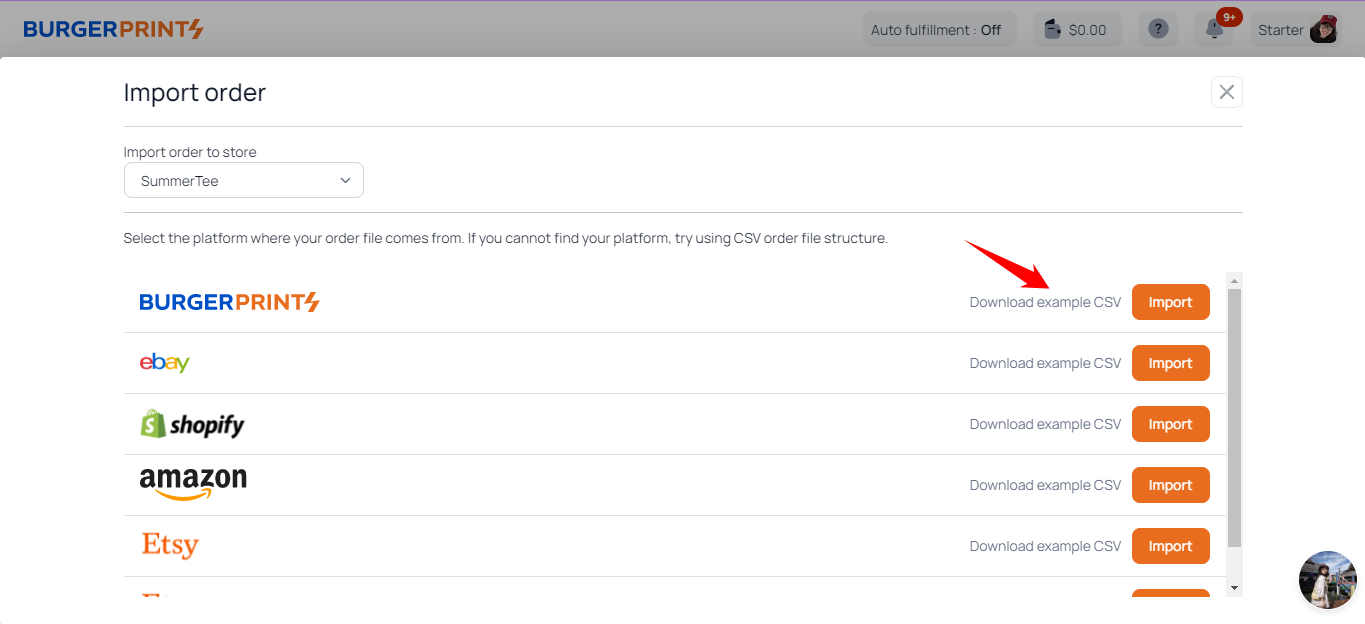
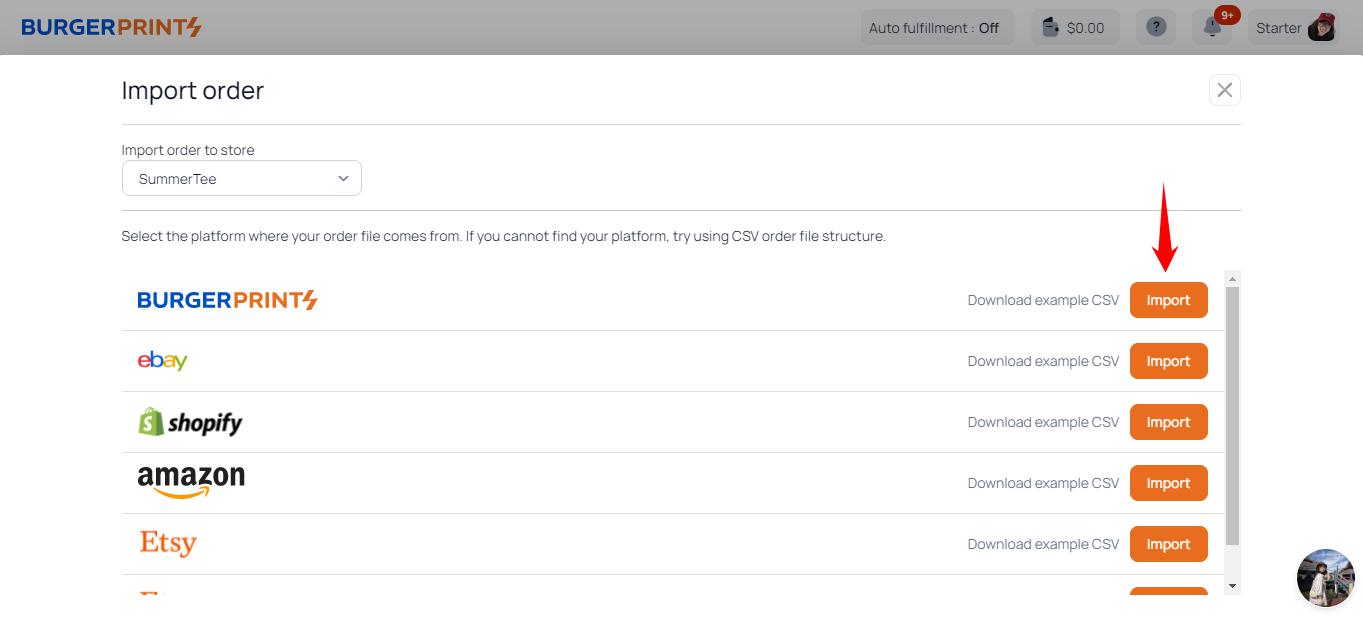
Step 1: Select Order and then click on Import.
Step 2: In the Import order interface, you will see the order platforms. Select the platform you want to create an order for using CSV and click on Download example CSV to download the file.
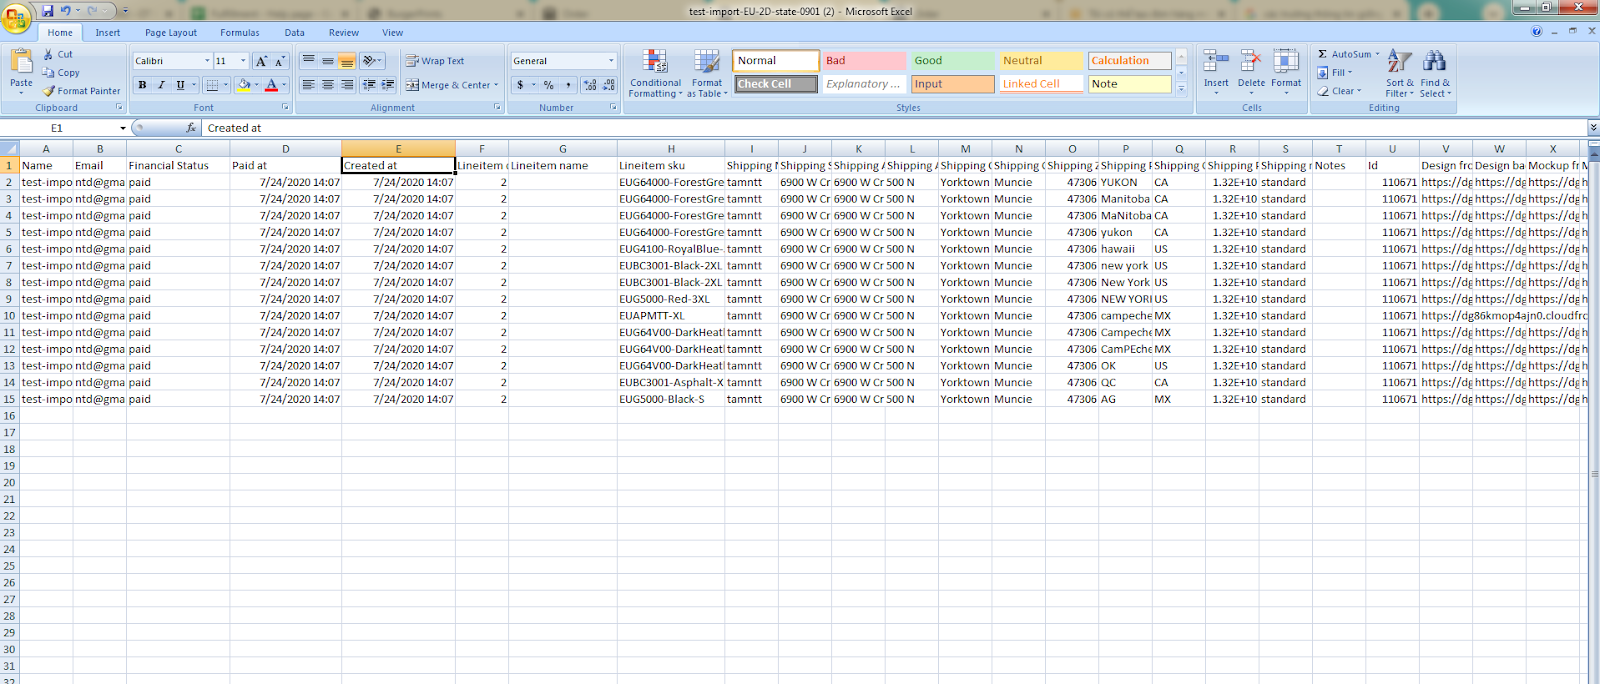
Fill in the CSV file as instructed. Note:
- The required information to fill in includes: Name, Line-item quantity, Line-item SKU, Shipping Name, Shipping Address1, Shipping Address2, Shipping City, Shipping Zip, Shipping Country, Design front URL, Design back URL, Mockup front URL, Mockup back URL, and Check valid address.
- Field Name: You should enter the corresponding order code created on the sales page to synchronize and facilitate easier order management.
- For orders with 2 or more products: If an order contains 2 or more products, enter each product on a separate line. Fill in the information on the following lines identical to the original line, and only fill in the columns: Line Item quantity, Line-item name, Line-item SKU so that the products ordered by the customer are grouped under one order code.
- For orders with multiple items: The information fields should be the same except for the columns Line-item quantity, Line-item name, Line-item SKU, Design front URL, Design back URL, Mockup front URL, Mockup back URL. Therefore, in the same order, if there is an item with missing information (or incorrect information) combined with an item with complete information, the system will check which item has complete information and use that item’s details. If no item has complete information, the order will default to the status “Incomplete” awaiting information supplementation.
Notes:
The design link is in “.emb” format. You can upload the design file to https://www.dropbox.com to get the link.
The shipping address must be within the US.
The design link must be correctly assigned to the embroidery areas allowed by the system.
Example: For the Unisex Crewneck Sweatshirt | Gildan 18000 (US EMB) base, the system allows embroidery in 4 areas: Front Chest, Left Chest, Right Sleeve, and Left Sleeve, corresponding to 4 columns in the CSV file: Emb Fchest, Emb Lchest, Emb Rsleeve, and Emb Lsleeve. However, if you assign the design link to columns other than these 4 allowed columns, the system will report an error “Sku does not support this printable,” and the order will not be successfully imported.
Check the corresponding embroidery areas for each base here.
The shipping method can be left blank or filled with one of the two values: ‘standard’ or ‘express’.
Step 3: After completing the CSV file, proceed to import the file.
See additional notes on creating orders using CSV here!
Creating Orders via API
BurgerPrints provides Sellers with a way to create orders via API using Postman API software. With this method, BurgerPrints has added the following information fields in the API when creating orders:
design_emb_front
design_emb_large_front
design_emb_left_front
design_emb_right_wrist
design_emb_left_wrist
design_emb_right_sleeve
design_emb_left_sleeve
Sellers, please refer to the detailed guide on creating orders via API here!
During the process of creating orders with sleeve printing areas, if you have any questions or encounter errors, please contact our support team immediately for the best assistance.