
 Tiếng Việt
User guide how to use the Logs Feature
The Logs feature has been implemented by BurgerPrints to help Sellers monitor all activities related to the fulfillment process on the system. With this feature, Sellers can transparently oversee all events occurring within their accounts, ensuring the best possible fulfillment experience with BurgerPrints.
The Logs feature records detailed history of the following activities:
-
- Import (Order Import, Tracking Import): Activities related to uploading orders and tracking codes to the system.
- Export (Product Export, Order Export, Tracking Export, Transaction History Export, Ticket Export): Activities related to exporting product files, orders, tracking codes, transaction history, and tickets from the system.
- Sync (Order Sync, Product Sync, Tracking Sync): Synchronizing orders from sales channels (such as WooCommerce, Shopify, etc.) to the system, and vice versa – syncing products/tracking from the system back to the channels.
- Auto Payment: Records details of automatic payment transactions when using the Auto Fulfillment feature.
1. How to View Import History
Step 1: Select the Logs tab on the left navigation bar, then choose Import.
Here, Sellers can view the history of imported orders and tracking codes uploaded to the system.
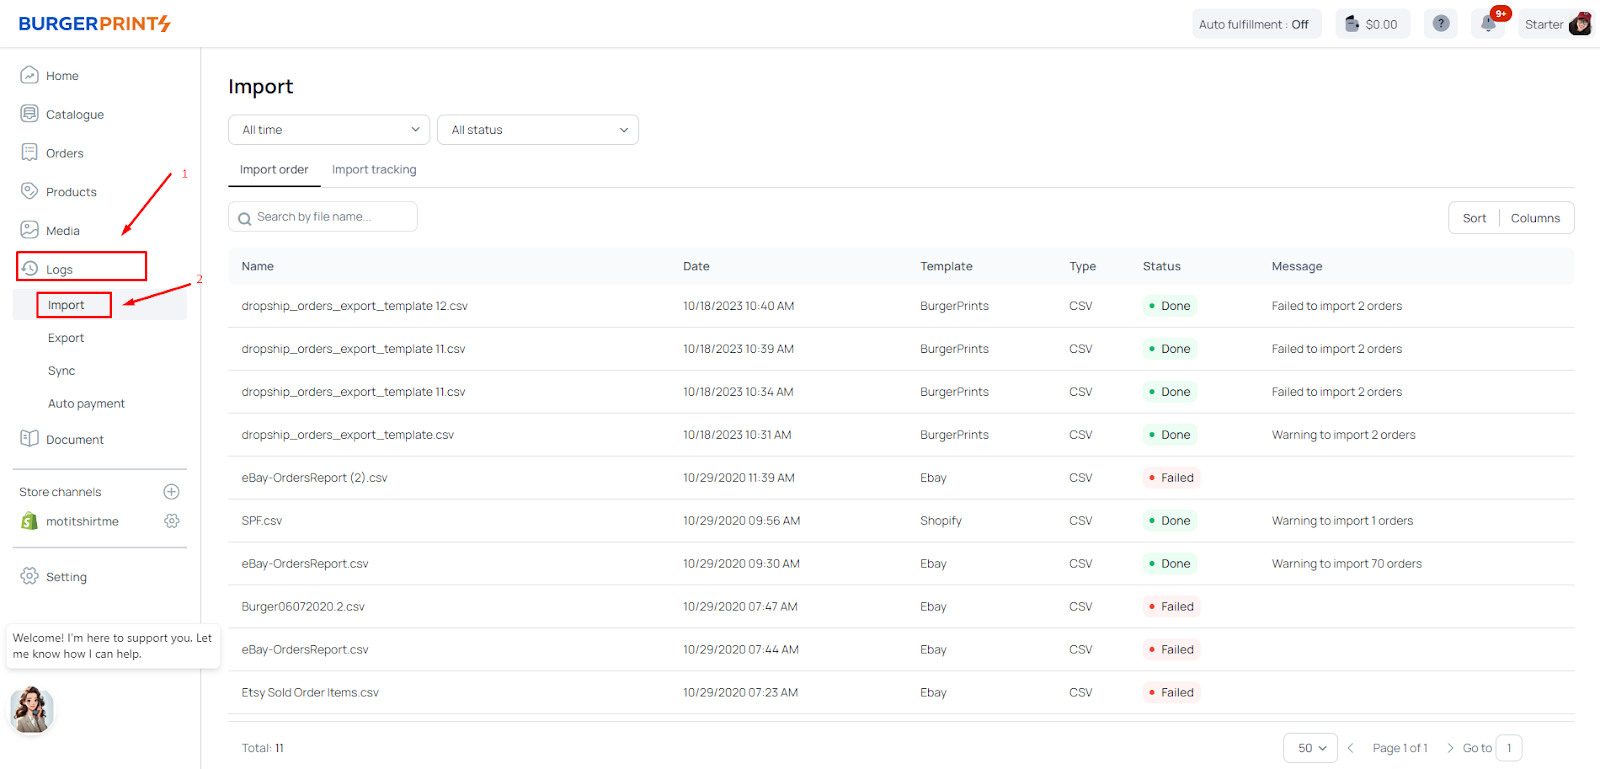
Step 2: Filter by time by clicking on “All time” and selecting the desired time range.
Additionally, you can filter by import status:
-
- Done
- Fail
- Pending

Step 3: To view order import history, select Import order to see the uploaded command files.

Click on each file name to see detailed information of each file, along with the upload status of each order.

Select Import tracking to view tracking files uploaded to the system.

Click on each file name to view details and status of each uploaded tracking code.

2. How to View Export History
Step 1: Select the Logs tab on the left navigation bar, then choose Export.
Here, Sellers can view the export history of product files, orders, tracking codes, transaction history, and tickets – including the time of export and download link.

Step 2: Filter by time by clicking on “All time” and selecting the desired time range.
Additionally, you can filter by export status:
-
- Done
- Fail

Step 3:
-
- Select Export product to view the product files exported from the system. Sellers can download the product files by clicking the download link (Export file URL).

-
- Select Export order to view the order files exported from the system. Sellers can download the order files by clicking the download link (Export file URL).

-
- Select Export tracking to view the tracking files exported from the system. Sellers can download the tracking files by clicking the download link (Export file URL).

-
- Select Export transaction history to view the transaction history files exported from the system. Sellers can download the transaction history files by clicking the download link (Export file URL).

-
- Select Export tickets to view the ticket files exported from the system. Sellers can download the ticket files by clicking the download link (Export file URL).

3. How to View Sync History
Step 1: Select the Logs tab on the left navigation bar, then choose Sync.
Here, Sellers can view the history of order synchronization from sales channels to the system, as well as product and tracking synchronization from the system back to the channels.

Step 2: Filter by time using “All time” and select the desired timeframe.
You can also filter by sync status:
-
- Done
- Fail
- Processing

Step 3:
-
- Select Sync order to view the list of orders synced to the system and their corresponding status.

-
- Select Sync product to view the list of products synced from the system to the sales channels.

Select Sync tracking to view the tracking codes synced from the system to the sales channels.

4. How to View Auto Payment History
Step 1: Select the Logs tab on the left navigation bar, then choose Auto payment.
Here, Sellers can monitor the detailed history of automatic payment transactions when using the Auto Fulfillment feature.

Step 2: Filter by time by clicking on “All time” and selecting the desired timeframe.
Additionally, filter by payment status:
-
- Done
- Fail
- Processing

Step 3: Click on each transaction to view the detailed payment history of that transaction.

If you have any questions or encounter difficulties during the usage process, please contact the BurgerPrints support team for timely assistance and clarification.