
 Tiếng Việt
Guide to Using the Ticket Feature
The Ticket feature is provided by BurgerPrints to help Sellers easily create and manage order-related issues directly on the system. When a problem arises with a paid order, the Seller simply needs to create a Ticket, and BurgerPrints will quickly receive the information and respond accurately.
1. How to Create a Ticket
Step 1: Log in to the BurgerPrints system at https://dash.burgerprints.com.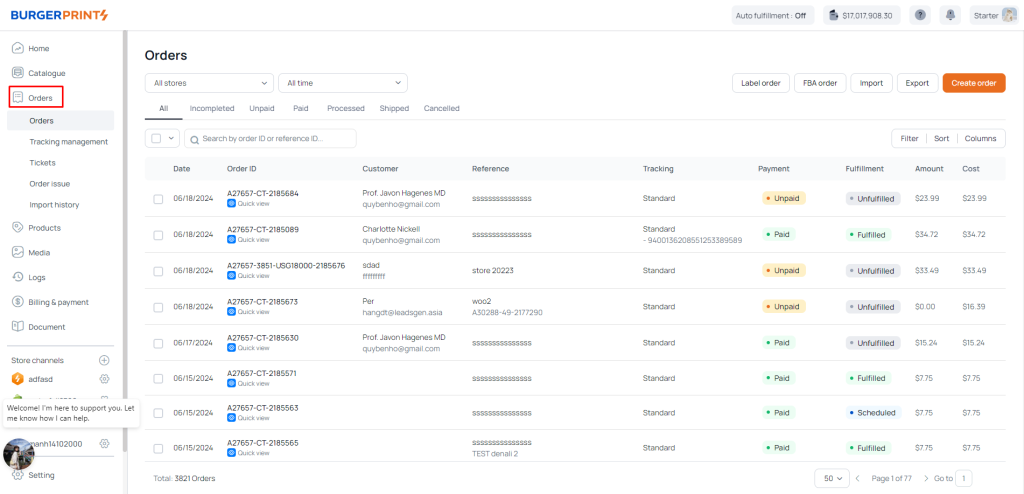
Step 2: From the left-hand menu, select the Orders tab.

Step 3: Identify the order for which you want to create a Ticket.

* Note: Tickets can only be created for paid orders. Depending on the order status, the system will suggest suitable request types.
1.1. For Orders in “Processed” Status
Sellers can create Tickets for the following types of requests:
1. Request Refund
Category: Cancel Order
-
- After creating an order, you have 30 minutes to manually cancel it directly in the Fulfillment Order Management system (before it enters or queues for production).
- If more than 30 minutes have passed or the order has entered production, you can no longer cancel it directly. In this case, please create a Ticket to check the possibility of order cancellation or shipping cancellation. You should include both requests in a single Ticket submission to ensure smooth handling and avoid missing the time window for intervention before the order proceeds to the next shipping stage (especially across time zones).
Example: Cancel order XXX. If full cancellation is not possible, please cancel the shipment and refund the shipping cost.
-
- Successful cancellations will be refunded to your B-Wallet within the same business day for continued use.

2. Adjust/Check Request
Categories:
(1) Change Order Information
-
- If you want to change the address, please note that the change won’t take effect immediately. The system will first verify whether the update is possible before the order is processed or sent to production.
Include your new address in the Describe your issue field for faster handling.- If the address can be updated, BurgerPrints will proceed with the change.
- Otherwise, you can clearly state: “If the address cannot be changed, please cancel the shipment and refund the shipping fee” in the same ticket creation. This helps resolve the shipping fee issue and avoids wasting time creating and waiting for a new ticket to be processed.
- If you want to change the address, please note that the change won’t take effect immediately. The system will first verify whether the update is possible before the order is processed or sent to production.
Example:
Change address
New address:
Unit B Armada Point, Estover Road,
Plymouth, PL6 7PY, GB
If the address cannot be changed, please cancel the shipment and refund the shipping cost.

-
- Change Design: In the “Describe your issue” field, specify your new design request and attach the new design file or link. The system will check whether the update is possible before production begins.
- In case the order has already entered production, BurgerPrints will not be able to support a design change. You can clearly state: “If the design cannot be changed, please cancel the shipment and refund the shipping fee” in the same ticket creation. This helps resolve the shipping fee issue and avoids wasting time creating and waiting for a new ticket to be processed.
- If the order has not yet been produced, BurgerPrints will confirm the ticket and proceed to process the order according to the updated design.
- Change Design: In the “Describe your issue” field, specify your new design request and attach the new design file or link. The system will check whether the update is possible before production begins.
Example:
Change design
New design link: xxx
If the design cannot be changed, please cancel the shipment and refund the shipping cost.

(2) Check Shipping Status
In the Describe your issue field, briefly describe the problem, e.g.:
-
-
Tracking not updating
-
Order delayed beyond the estimated delivery date
-
Incorrect tracking information
-
(3) Other
Required fields: Request Type, Detailed Description, and Related Product(s).
Important Notes:
-
-
Changes can only be made before production or shipping begins. Provide full details in the first Ticket to allow faster handling.
-
Incomplete or late requests (missing address, design file, or specific details) may delay processing and risk missing the intervention window.
-
Your request will be reviewed and responded to within 24 hours after submission.
-
1.2. For Orders in “Shipped” Status
Sellers can create Tickets for the following request types:
-
- Request Refund
-
- Request Remake
-
- Request Adjust/Check
Categories for each request type:
-
- For Refund or Remake:
→ Category: Shipping Issue or Defective Item - For Adjust/Check:
→ Category: Other
- For Refund or Remake:
Required fields: Product(s), request type, detailed issue description, and image(s) (if applicable).
When creating a Ticket, a pop-up window will appear for you to fill in the details:

-
- Select Product(s): Choose the product(s) involved in the order (multiple selections allowed).
- Request Type:
+ Refund → Request a refund
+ Remake → Request a replacement
+ Adjust/check → Request info updates or status check
-
- Select Category:
+ Refund/Remake → Choose Shipping Issue (e.g., late delivery, lost order) or Defective Item (e.g., misprint, wrong size/color).
+ Adjust/check → Choose Other for order-related issues not listed above.
Once all information is filled out, click Create Ticket to complete the process.
2. Monitoring and Managing Created Tickets
Step 1: After logging in, go to the Orders tab → select Tickets tab.


Step 2: You will see a full list of Tickets you’ve submitted, including current status and relevant details.
2.1. For Tickets in “New” Status
You can perform the following actions:
-
- Edit Ticket:
Click the pencil icon in the Respond note column.


Update the necessary information, then click Update Ticket.
-
- Delete Ticket:

Click the trash bin icon in the Respond note column of the Ticket you wish to delete.
A confirmation message will appear → Click the red Confirm button to proceed.
-
- Chat with Support Team:
Click the note icon in the Respond note.
This opens a chat window with the BurgerPrints support team, where you can discuss order-related issues in the Ticket.
The BurgerPrints team regularly checks and handles Tickets to forward them to the appropriate department for prompt response.

2.2. Tickets with “Awaiting” Status
-
- Case 1: Ticket created by BurgerPrints
→ When an adjustment is required from the system side, BurgerPrints will proactively create a Ticket for your reference. A notification email will be sent, and the Ticket will appear with the status Awaiting.
-
- Case 2: Ticket created by the Seller
→ When BurgerPrints responds to a Ticket you created, its status will automatically change from New to Awaiting. You should monitor it regularly to stay updated on the resolution progress.
2.3. Tickets with “Responded” Status
When you reply in the Ticket’s chat window, the system will automatically update its status to Responded.
BurgerPrints will continue reviewing the Ticket content and provide a follow-up response. We encourage you to leave feedback on the Ticket handling process to help us improve service quality.
3. Ticket Search Function & Important Notes
3.1. Search Tickets by Order ID and Ref ID
Sellers can search for existing Tickets by entering the Order ID or the Reference ID. Here’s how to do it:
Step 1: Log in to the system and go to the Orders tab.
Step 2: Switch to the Tickets tab and enter either the Order ID or Ref ID to find the corresponding Ticket.


3.2. Important Notes
-
-
If a Ticket has received a response but no further action is needed, it will be automatically closed after 15 days.
-
For failed delivery Tickets, please respond within 3 days; otherwise, the Ticket will be closed.
-
For out-of-stock or copyright violation notifications, Sellers must confirm within 30 days, or the Ticket will be closed automatically.
-
If you need further assistance or have any questions about the Ticket creation or resolution process, please contact the BurgerPrints support team via the Ticket system or official communication channels for prompt assistance.